

Google Tag Manager Environments: How to Set Them Up and Use Them Safely
Google Tag Manager environments allow teams to deploy and test different container versions across development, staging, and production without affecting live users.

Ricardo Cristofolini
Senior Implementation Specialist, Data Solutions
I’m passionate about what I do. If you meet my manager or co-workers, they would say I’m a team player, engaged and always excited to learn something new. Like everyone else I have some flaws. However I’m not afraid to work around those to bring the best in myself and for the company
Have you ever found yourself in a situation where multiple teams are editing the same GTM container? Marketing adding new tags, developers testing dataLayer updates, and analytics implementing tracking fixes, all at once? It’s a common situation.
Without the proper control, one wrong publish can break tracking or expose unfinished configurations to live users. And, yes, while workspaces can help you with part of this problem, it’s not a full solution. The reason is that workspaces organize who is working on what. Environments control where those changes are deployed and tested.
So, even though your team is well-versed enough in GTM to use individual workspaces without environments, everything will be pushed to the same production location.
That’s where the (hidden) power of Environments lies. Google Tag Manager environments offer a powerful way to manage and deploy your tags, triggers, and variables across different stages of your development and release cycle. By separating your GTM configuration into distinct environments, you can ensure that testing and development don't interfere with your live production site.
In this article, I’m going to help you out with the steps to make sure you can set up your environment the best way possible.
Step 1 - Setting Up GTM Environments
Setting up GTM environments involves both configuration within GTM itself and adjustments to your website's implementation.
GTM Configuration
Create New Environments: In your GTM container, navigate to "Admin" > "Environments" (under the Container tab).
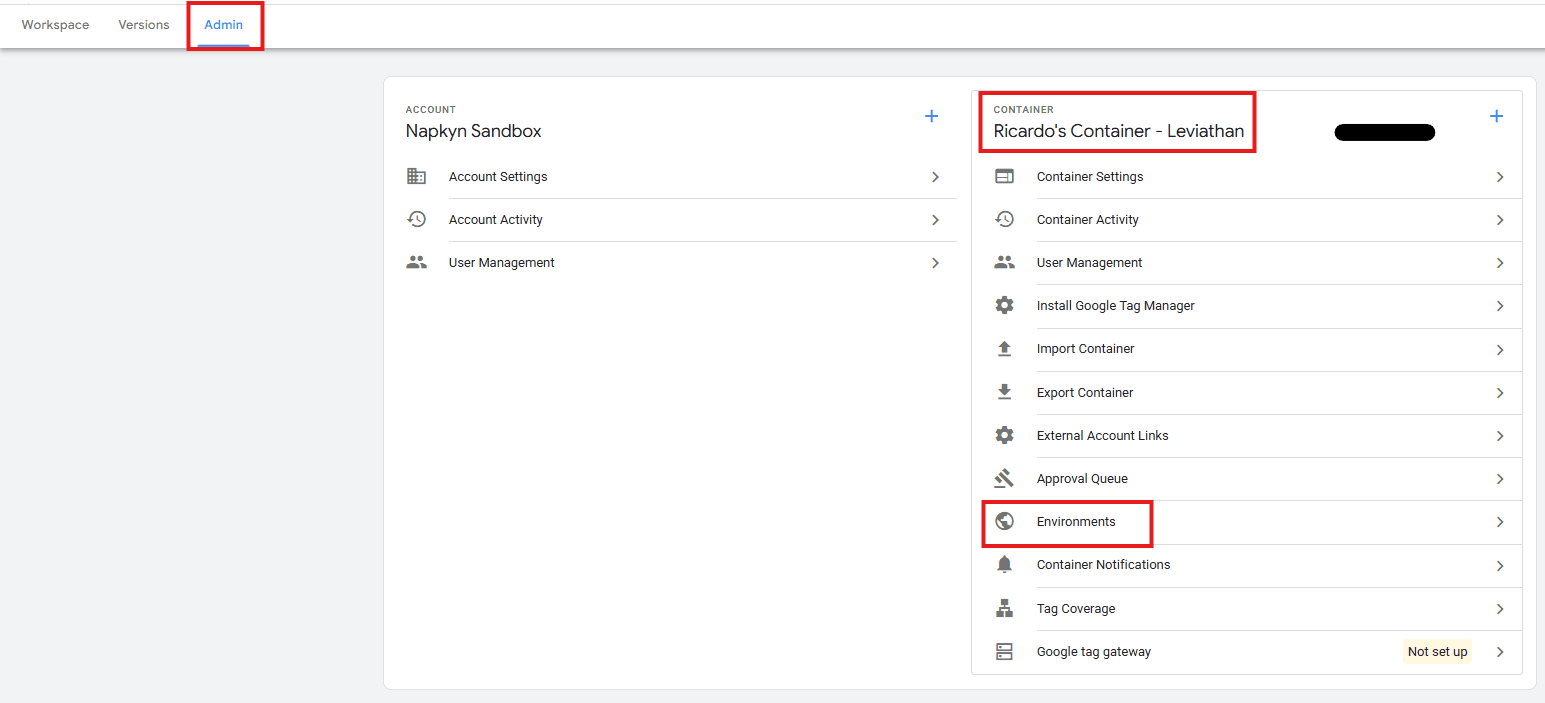
Once inside the “Environments” option, click on the "New” button in the top right corner.
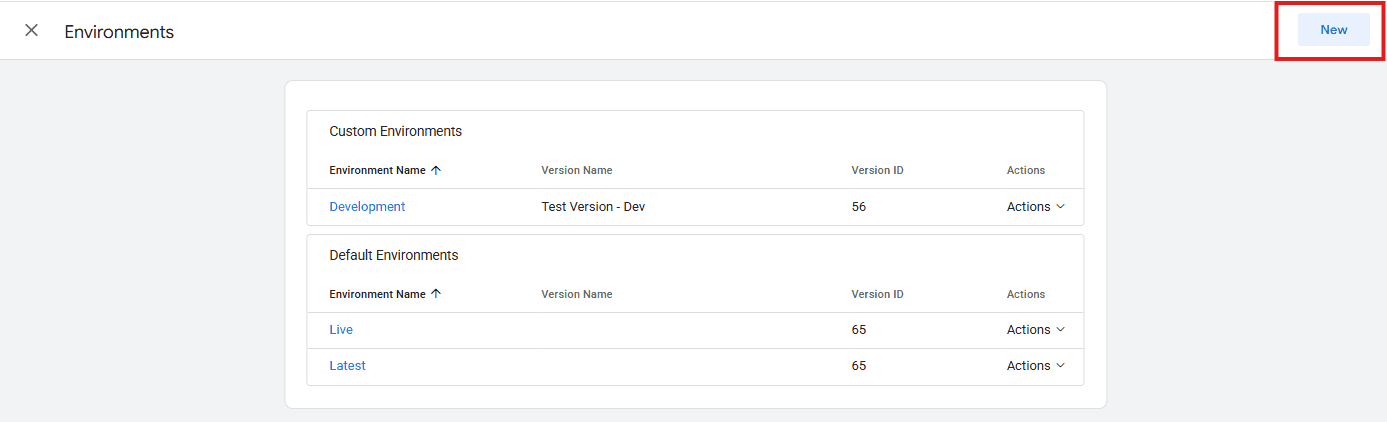
Name and Configure: Give your environment a descriptive name (e.g., "Development," "Staging," "Production"). You will also have the option to add a “Description” (recommended) and a destination URL, which is basically a link to your domain. There is also a little checkbox that will give you Debugging by Default, but that is up to you to mark or not.
Start using the Environment: Once you confirm the creation, a new screen will appear asking you to “Publish to [environment_name]”. At this point, what GTM wants is to check with you which version you want to push to that Environment. Here, GTM will also give you two ways of using the environment you just created:
Share Preview Link: Get a Share Preview link that users can click to test in this environment by selecting “Share Preview” in the Actions menu for the environment.
With a Snippet: Use a special container snippet on pages published to this environment instead of your existing snippet. You can get this snippet by selecting “Get Snippet” in the Actions menu for the environment.
Choose a Container Version: This is pretty straightforward. Select a version and click on Publish. That version will then be published to that environment. Notice that, in the Publish screen, the “Publish to Environment” will already be selected, so you can’t really miss it and publish the configuration to Production, for example.
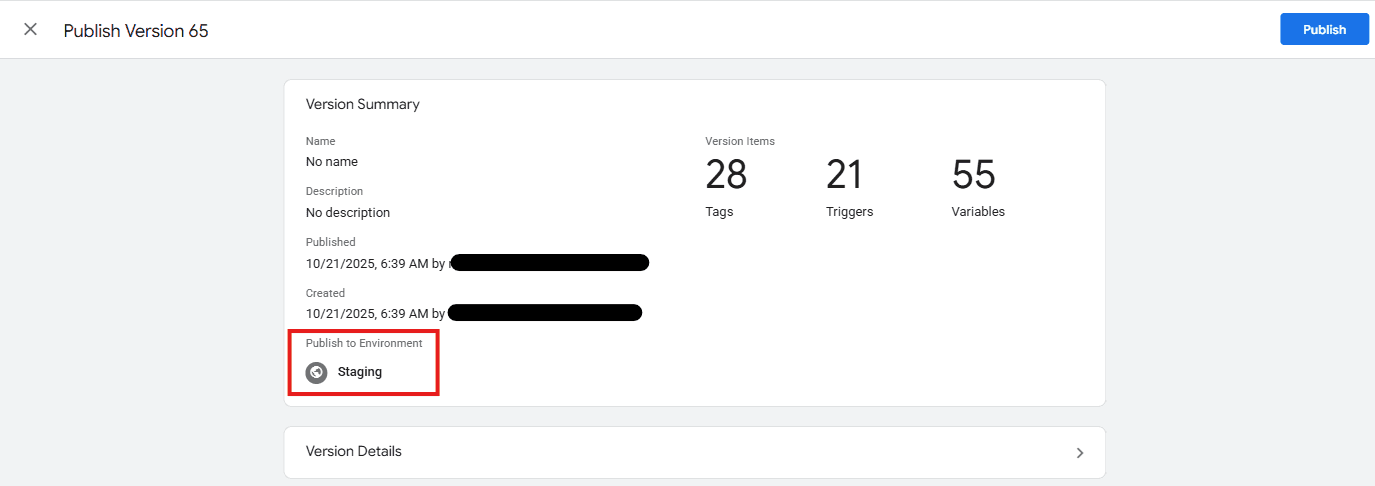
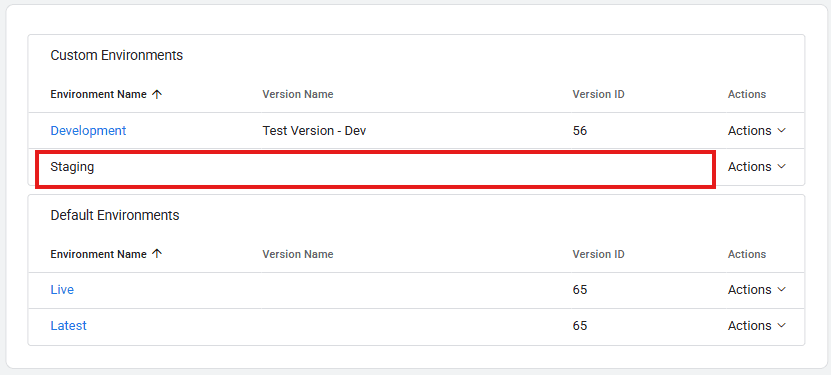
NOTE: You don’t actually need to push a version to this environment. If you click outside of this screen, the list of environments will show with “Version Name” empty/blank. HOWEVER, if you don’t push any version to it, you won’t be able to get the snippet.
(Optional) Using the Snippets: Each new environment will generate its own GTM container snippet (the
gtm.jsscript). This snippet will contain a unique environment ID.
The snippet would look something like this:
You can get this snippet by clicking on one of the Environment Names in the Environments screen.
Step 2 - Website Implementation
Now that you have the first piece of the puzzle ready (GTM), the next step is to work on the Website. The steps here can happen in many ways, depending on your current GTM deployment structure. Furthermore, you may need to talk with one of your developers to add the snippet to the site's core code, just like the initial GTM snippet implementation.
Replace GTM Snippets: For each environment on your website (e.g., your development server, staging server, and production server), you will need to replace the standard GTM container snippet with the environment-specific snippet generated in the previous step, if you have a previously implemented snippet. Otherwise, the environment should be your default/standard one.
Conditional Loading (Optional but Recommended): For more robust setups, you can implement conditional logic on your website's backend to load the correct GTM environment snippet based on the current environment of the website. This prevents accidental deployment of development tags to production and vice versa.
Advantages and Disadvantages of GTM Environments
There are indeed some disadvantages of using the GTM Environments, just like any other implementation or technology. Sometimes it works, sometimes it doesn’t. The important thing is if it solves your problems.
Let’s have a look at those.
Advantages
Safer Testing: Isolate development and testing changes without impacting your live production site.
Streamlined Collaboration: Multiple team members can work on different environments concurrently.
Version Control: Environments help manage different versions of your GTM container for distinct purposes.
Reduced Errors: Minimizes the risk of deploying broken or incomplete tags to your production environment.
Faster Iteration: Developers can test and iterate quickly without waiting for full production deployments.
Disadvantages
Increased Complexity: Requires careful setup and ongoing management of multiple GTM snippets.
Potential for Misconfiguration: If not implemented correctly, you could still accidentally deploy the wrong environment to the wrong site.
Deployment Overhead: Requires publishing each environment separately when changes are made.
Requires Developer Involvement: Initial setup and ongoing snippet management often require developer resources.
Examples of Implementation
Here are common ways GTM environments are utilized:
Environment | Purpose | Typical Tags |
|---|---|---|
Development | Initial setup and testing of new tags and features. | Debugging tools, custom event listeners, and unverified tracking. |
Staging | User Acceptance Testing (UAT) and quality assurance. | Verified tracking, internal analytics, and specific QA tools. |
Production | Live website tracking and data collection. | Core analytics (GA4, Universal Analytics), advertising pixels, production-ready tags. |
Still, there’s no right or wrong way to implement this approach. Some companies have multiple staging sites. Others have separate development depending on their site infrastructure. As mentioned above, the way you implement the Environments should be based on your requirements, not the internet or templates.
When NOT to Use GTM Environments
While highly beneficial, GTM environments may not always be necessary:
Very Small Websites/Simple Tracking: For websites with minimal tracking needs and infrequent changes, the overhead of managing environments might outweigh the benefits.
Single-Person Operation: If you are the only one managing GTM and are comfortable with direct publishing to production after local testing, environments might add unnecessary steps.
Strictly Local Development: If all testing is done exclusively on a local machine and never deployed to a separate server before production, environments might be overkill.
Common Issues Users Encountered
Incorrect Snippet Deployment: The most frequent issue is deploying the wrong GTM environment snippet to the wrong website environment, leading to incorrect data collection or broken functionality.
Forgetting to Publish: Changes made in a GTM environment need to be explicitly published for them to take effect. Forgetting this step is a common oversight.
Conflicting Variables/Triggers: While environments provide separation, it's possible to create conflicting variables or triggers if not managed carefully across environments, especially if copying configurations.
Cache Issues: Website caching can sometimes prevent the updated GTM snippet from loading immediately, leading to confusion during testing.
Lack of Communication: Without clear communication among team members, it's easy for one person to make changes in an environment that another person is actively working on, leading to overwrites or unexpected behaviour.
Overwriting of work, or collisions of work: While workspaces can alleviate some of the issues associated with overwriting others' work or running into conflicts, they can also introduce their own set of problems in this area. While you may have separate environments, it’s important to note that all environments share a single publish stream. This means that if you push your work out to your Stage environment to test, and someone comes along after you and creates a Workspace, there’s a chance that they are pulling your pre-production-ready work into their build. And then if they need to push their work out before yours has finished its pre-production test, they could unknowingly push your build into production before it’s ready. It’s also important to note that published versions in different environments CANNOT be merged once published. One will replace the other.
If you are managing multiple teams, complex deployments, or high-risk tracking changes, Google Tag Manager environments can significantly reduce errors and improve confidence in your releases. That said, they require thoughtful setup and clear processes to deliver real value. If you would like help designing, implementing, or validating a GTM environment strategy that fits your organization’s workflow, Napkyn can help. Our team works with marketing, analytics, and development teams to ensure tracking changes are tested safely, deployed correctly, and aligned with your broader measurement strategy. Reach out to Napkyn to start the conversation.
More Insights

Understanding the IAB TCF v2.3 Update: New Vendor Disclosure Requirements Explained

Rob English
Director, Data Solutions
Jun 17, 2026
Read More

How to Choose the Right ETL Tool for Your Data Pipeline

Cem Bakar
Cloud Architect
Jun 10, 2026
Read More

CM360 Path to Conversion Reporting: Full Customer Journey Attribution

Monika Boldak
Associate Director, Marketing
Jun 3, 2026
Read More
More Insights
Sign Up For Our Newsletter

Napkyn Inc.
204-78 George Street, Ottawa, Ontario, K1N 5W1, Canada
Napkyn US
6 East 32nd Street, 9th Floor, New York, NY 10016, USA
212-247-0800 | info@napkyn.com


Google Tag Manager Environments: How to Set Them Up and Use Them Safely
Google Tag Manager environments allow teams to deploy and test different container versions across development, staging, and production without affecting live users.
Ricardo Cristofolini
Senior Implementation Specialist, Data Solutions
January 14, 2026
I’m passionate about what I do. If you meet my manager or co-workers, they would say I’m a team player, engaged and always excited to learn something new. Like everyone else I have some flaws. However I’m not afraid to work around those to bring the best in myself and for the company
Have you ever found yourself in a situation where multiple teams are editing the same GTM container? Marketing adding new tags, developers testing dataLayer updates, and analytics implementing tracking fixes, all at once? It’s a common situation.
Without the proper control, one wrong publish can break tracking or expose unfinished configurations to live users. And, yes, while workspaces can help you with part of this problem, it’s not a full solution. The reason is that workspaces organize who is working on what. Environments control where those changes are deployed and tested.
So, even though your team is well-versed enough in GTM to use individual workspaces without environments, everything will be pushed to the same production location.
That’s where the (hidden) power of Environments lies. Google Tag Manager environments offer a powerful way to manage and deploy your tags, triggers, and variables across different stages of your development and release cycle. By separating your GTM configuration into distinct environments, you can ensure that testing and development don't interfere with your live production site.
In this article, I’m going to help you out with the steps to make sure you can set up your environment the best way possible.
Step 1 - Setting Up GTM Environments
Setting up GTM environments involves both configuration within GTM itself and adjustments to your website's implementation.
GTM Configuration
Create New Environments: In your GTM container, navigate to "Admin" > "Environments" (under the Container tab).
Once inside the “Environments” option, click on the "New” button in the top right corner.
Name and Configure: Give your environment a descriptive name (e.g., "Development," "Staging," "Production"). You will also have the option to add a “Description” (recommended) and a destination URL, which is basically a link to your domain. There is also a little checkbox that will give you Debugging by Default, but that is up to you to mark or not.
Start using the Environment: Once you confirm the creation, a new screen will appear asking you to “Publish to [environment_name]”. At this point, what GTM wants is to check with you which version you want to push to that Environment. Here, GTM will also give you two ways of using the environment you just created:
Share Preview Link: Get a Share Preview link that users can click to test in this environment by selecting “Share Preview” in the Actions menu for the environment.
With a Snippet: Use a special container snippet on pages published to this environment instead of your existing snippet. You can get this snippet by selecting “Get Snippet” in the Actions menu for the environment.
Choose a Container Version: This is pretty straightforward. Select a version and click on Publish. That version will then be published to that environment. Notice that, in the Publish screen, the “Publish to Environment” will already be selected, so you can’t really miss it and publish the configuration to Production, for example.
NOTE: You don’t actually need to push a version to this environment. If you click outside of this screen, the list of environments will show with “Version Name” empty/blank. HOWEVER, if you don’t push any version to it, you won’t be able to get the snippet.
(Optional) Using the Snippets: Each new environment will generate its own GTM container snippet (the
gtm.jsscript). This snippet will contain a unique environment ID.
The snippet would look something like this:
You can get this snippet by clicking on one of the Environment Names in the Environments screen.
Step 2 - Website Implementation
Now that you have the first piece of the puzzle ready (GTM), the next step is to work on the Website. The steps here can happen in many ways, depending on your current GTM deployment structure. Furthermore, you may need to talk with one of your developers to add the snippet to the site's core code, just like the initial GTM snippet implementation.
Replace GTM Snippets: For each environment on your website (e.g., your development server, staging server, and production server), you will need to replace the standard GTM container snippet with the environment-specific snippet generated in the previous step, if you have a previously implemented snippet. Otherwise, the environment should be your default/standard one.
Conditional Loading (Optional but Recommended): For more robust setups, you can implement conditional logic on your website's backend to load the correct GTM environment snippet based on the current environment of the website. This prevents accidental deployment of development tags to production and vice versa.
Advantages and Disadvantages of GTM Environments
There are indeed some disadvantages of using the GTM Environments, just like any other implementation or technology. Sometimes it works, sometimes it doesn’t. The important thing is if it solves your problems.
Let’s have a look at those.
Advantages
Safer Testing: Isolate development and testing changes without impacting your live production site.
Streamlined Collaboration: Multiple team members can work on different environments concurrently.
Version Control: Environments help manage different versions of your GTM container for distinct purposes.
Reduced Errors: Minimizes the risk of deploying broken or incomplete tags to your production environment.
Faster Iteration: Developers can test and iterate quickly without waiting for full production deployments.
Disadvantages
Increased Complexity: Requires careful setup and ongoing management of multiple GTM snippets.
Potential for Misconfiguration: If not implemented correctly, you could still accidentally deploy the wrong environment to the wrong site.
Deployment Overhead: Requires publishing each environment separately when changes are made.
Requires Developer Involvement: Initial setup and ongoing snippet management often require developer resources.
Examples of Implementation
Here are common ways GTM environments are utilized:
Environment | Purpose | Typical Tags |
|---|---|---|
Development | Initial setup and testing of new tags and features. | Debugging tools, custom event listeners, and unverified tracking. |
Staging | User Acceptance Testing (UAT) and quality assurance. | Verified tracking, internal analytics, and specific QA tools. |
Production | Live website tracking and data collection. | Core analytics (GA4, Universal Analytics), advertising pixels, production-ready tags. |
Still, there’s no right or wrong way to implement this approach. Some companies have multiple staging sites. Others have separate development depending on their site infrastructure. As mentioned above, the way you implement the Environments should be based on your requirements, not the internet or templates.
When NOT to Use GTM Environments
While highly beneficial, GTM environments may not always be necessary:
Very Small Websites/Simple Tracking: For websites with minimal tracking needs and infrequent changes, the overhead of managing environments might outweigh the benefits.
Single-Person Operation: If you are the only one managing GTM and are comfortable with direct publishing to production after local testing, environments might add unnecessary steps.
Strictly Local Development: If all testing is done exclusively on a local machine and never deployed to a separate server before production, environments might be overkill.
Common Issues Users Encountered
Incorrect Snippet Deployment: The most frequent issue is deploying the wrong GTM environment snippet to the wrong website environment, leading to incorrect data collection or broken functionality.
Forgetting to Publish: Changes made in a GTM environment need to be explicitly published for them to take effect. Forgetting this step is a common oversight.
Conflicting Variables/Triggers: While environments provide separation, it's possible to create conflicting variables or triggers if not managed carefully across environments, especially if copying configurations.
Cache Issues: Website caching can sometimes prevent the updated GTM snippet from loading immediately, leading to confusion during testing.
Lack of Communication: Without clear communication among team members, it's easy for one person to make changes in an environment that another person is actively working on, leading to overwrites or unexpected behaviour.
Overwriting of work, or collisions of work: While workspaces can alleviate some of the issues associated with overwriting others' work or running into conflicts, they can also introduce their own set of problems in this area. While you may have separate environments, it’s important to note that all environments share a single publish stream. This means that if you push your work out to your Stage environment to test, and someone comes along after you and creates a Workspace, there’s a chance that they are pulling your pre-production-ready work into their build. And then if they need to push their work out before yours has finished its pre-production test, they could unknowingly push your build into production before it’s ready. It’s also important to note that published versions in different environments CANNOT be merged once published. One will replace the other.
If you are managing multiple teams, complex deployments, or high-risk tracking changes, Google Tag Manager environments can significantly reduce errors and improve confidence in your releases. That said, they require thoughtful setup and clear processes to deliver real value. If you would like help designing, implementing, or validating a GTM environment strategy that fits your organization’s workflow, Napkyn can help. Our team works with marketing, analytics, and development teams to ensure tracking changes are tested safely, deployed correctly, and aligned with your broader measurement strategy. Reach out to Napkyn to start the conversation.
More Insights

Why GA4, Google Ads, and BigQuery Numbers Don’t Match

Chris Wright
Associate Director, Training and Development
Jul 15, 2026
Read More

Google Ads Data Manager: Building More Reliable Marketing Data Pipelines with First-Party Data
Monika Boldak
Associate Director, Marketing
Jul 8, 2026
Read More

Adblockers and Consent Management: Why Server-Side Tagging Is Not a Workaround
Rob English
Director, Data Solutions
Jun 24, 2026
Read More
More Insights
Sign Up For Our Newsletter